Startling Color Change with Nikon LS-1000

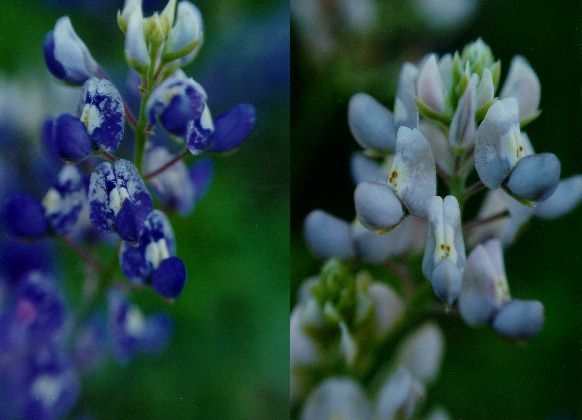
The above is a collage of two scans I made at Kinkos a few years ago from prints of bluebonnets I've raised.
I took these pictures to illustrate the range of color forms I have produced. These two specimens are flowers I
have deemed significant because of their unusual nature. The one on the left is unusual in the mottling of the
color, which sometimes shows intriguing negative mirror image patterns, presumably because the colored surfaces
stick together when the flower is in bud. Then when the flower opens, the color is ripped off one side to the
benefit of the other side.
The other flower is unique in that the flower is almost entirely grey. The photographs of the grey inflorescence is
the subject of this article.
The first picture is the default scan with preview enabled on Nikon's LS-1000 film scanner.
The identification on the top of the film is Kodak Gold 100-5.

When I first saw the scan, it was obvious the color was off, but I wasn't sure what the correct color was supposed
to be or how to color correct the picture. Since I have also bred other colors, including a magenta variety, there
was a chance this was a picture of one of those. Setting white and black points is not an option. There are no
black points on the image. One could argue, I suppose, that there are white points on the flowers, but there are
fine nuances of color within the white field, including a patch of yellow that is usually, but not always, present
on bluebonnets. I decided to use a default scan using a preview whose levels were set by scanning another picture
with preview turned on. Here is the picture that was used to set the levels.

The result was an improvement, but still unsatisfactory.

The image I used to set the levels has a tremendous amount of green in it, and this no doubt biased the scanner in
setting the levels. I decided to find another image on the same negative to use for setting levels. It happened that I
had one, a picture of a street festival. The lighting is a bit different, bright sunlight rather than overcast, but
close enough, I hoped. The subject matter seemed more neutral, and more likely to be within the scope of
sample images used to calibrate the LS-1000. In any case, there were no better candidates on this roll.

After setting levels with the "people picture" I rescanned the bluebonnet, after first turning prescan off. Here
is the resulting picture.

It was suddenly obvious that the color form I was looking at was the grey form. The background serves as a bit of
confirmation of the correct color. Behind the flowers is the blurred image of my greenhouse, which is made of
clear corrigated fiber-glass/epoxy, which gets a creamy color with age. At the bottom of the picture is blurred
foliage. I decided the colors were fine, and I reset the black level a bit for my final image, which I am
reasonably satisfied with.

The next picture on the roll was a picture of the same inflorescence taken purposefully at a different angle to
get a different background. Here are the two pictures using LS-1000 default levels and levels set using the
technique described above.


The color fastness in light of the background change confirms the validity of this technique.
Now I figured I had a poor scan of the larger picture of the plants, so I rescanned setting levels as above,
then boosting the brightness by shifing the white point. I've included the original scan again for a better
comparison.


If you'd like to send me comments, please direct them to lights@onr.com.
See more bluebonnet pictures
mostly scanned from Kodachrome slides at http://the-light.com/bluebonn/bluebon.html. I still have trouble getting
good scans from Kodachrome.


